Monday, January 31, 2011

Award For You !!!

A big thank you to Elizabeth,http://foodandthriftfinds.blogspot.com/ I love her for taking the time & the effort for bringing this wonderful cheer in our food blogger community:) I want everyone on my followers list to please collect this award and paste it on your blog and enjoy it and show it off to all and sundry :) And finally a big hug to my dear friend Elizabeth-You are such a wonderful person and I love all your thrift finds and all the pictures from Florida and the warmth they bring to this part of cold land.I enjoy reading about your grand children and the things they do and most of all I enjoy the food you prepare and the ideas behind your preparation.Thanks Elizabeth :)!!!

Saturday, January 29, 2011

Ciabatta Bread & Sundried Tomato & basil,Mozarella Sandwich


Manasi and myself ,we enjoy  eating ciabatta with olive oil and some freshly grated parmesan . I buy this italian bread from Trader Joe's and I think there ciabatta is particularly fantsatic .I buy this bread very often and everytime I buy it I give it a serious thought of baking it in my oven some day.


 The last  tiny piece of Ciabatta from Trader Joe's was lying on the kitchen island and I still had plenty of fresh mozzarella & sun dried tomato and fresh basil  I had bought to make ciabatta sandwiches for Manasi. So I set out to make this very versatile Italian ,"slipper bread". The shape of the bread justifies its name.It quite resembles a slipper,with its characteristic long & flat shape. I looked up on the net and found one recipe which had been reviewed and had solid feedback :) I followed the instructions to the T as I knew this artisan bread needs to have the perfect crackly crust and a moist crumb. Trust me-The bread looked great,tasted so perfect that between Manasi & me we finished of more than half of it  while it was still warm ,with just olive oil. The crust and the crumb soaked the oil so well-it tasted exquisitely divine . I later used the remaining ciabatta to make Manasi a tomato mozzarella sandwich.


Here's the recipe for Ciabatta bread:

Ingredients For Sponge:
Active Dry Yeast: 1/8 tsp
water: 2 tbsp (105-115 f )
 room temprature water: 1/3 cup
Bread flour: 1/3 cup

For Bread:
Active Dry Yeast: 1/2 tsp
Warm Milk: 2 tbsp (102-115 f )
Room temprature water: 2/3
Olive Oil: 1 tbsp
Bread Flour: 2 cups
Salt: 1 1/2 tsp

Method to Make the Sponge:
Stir together warm water and yeast.
Let this stand till frothy/creamy
Transfer this mixture to another bowl and to this add 1/3 cup room tempartaure water and flour.
Stir this for 4 minutes.Make sure you stir this for 4 minutes,it will come together.
Now cover the bowl with plastic wrap and leave it for half a day minimum 12 hours or upto 1 day at cool room temprature.

Method for the Bread:
Mix the milk and yeast and let it sit for 5 minutes until creamy or frothy. Now in a food processor blend milk with sponge,water,oil & flour and run the processor till moistined. Run the food processor for a couple minutes more,add salt and run the food processor for couple minutes again.
Please Note: The original recipe called for beating this in an electric mixre with dough hook but I kneaded the dough in the food processor and it turned out just fine. You can also knead by hand. Just follow the time needed to beat/knead or process.

Scrape dough and cover with plastic wrap until doubled 1 1/2 hours.

Baking The Ciabatta Bread:
Dough will be sticky and full of bubbles. Cut two pieces of parchement paper approximately 10 inches by 6. Place on baking sheet and flour well.
Turn dough out on a well floured surface and cut in two halves.
Transfer each half to paper and shape into irregular oval shape about 7 inches.
Dip fingers in flour and dimple loaves.
Dust tops with flour.
Cover with dampened kitchen towel and let it rise double in size for roughly 1 1/2 hours or  more untill doubled in size.
Heat the pizza stone in the lowest rack at 425 d farhaneight 45 minutes before you are ready to bake the bread.
Transfer 1 loaf along with the parchment paper on the pizza stone and bake for 20 minutes or till the top is  pale golden .
remove this and keep it on the rack to cool and repeat the same with another roll.


Recipe for Ciabatta Sandwich:

Ingredinets:
Fresh mozzarella : Cut thin rounds
Sun dried Tomato: chopped into small pieces.
basil: 5-7 leaves chopped.
Pesto: 2 tbsp
Ciabatta loaf:  2 pieces.

Take 2 pieces of ciabatta loaf and spread pesto on both sides. Arrange mozzarella rounds,and spread chopped sun dried tomato along with chopped basil leaves on one loaf. Press the othet half on top of this and heat this on  a griddle and press it tight with  a plate or keep something heavy on the plate.. Do this on both sides till the sandwich is flat and slightly crisp & brown on both sides. Please make this in a panini maker if you have one.


 Notes:  Please follow the  exact instructions for the sponge .
You can add a slice of cheddar cheese and a fresh tomato slice too along with other things.

Wednesday, January 26, 2011

Tricolor Idli's to Celebrate India's Republic Day !


Ingredients:
For Idli:
• One cup Sooji (Rava/Semolina)
• 2 tablespoon plain Yogurt
• 2 tablespoon Spinach paste 0r Pureed Green peas
• 2 tablespoon Carrot Puree
• 1-1/2 teaspoon baking powder
• Salt (according to taste)


Method:
1. Divide one cup sooji/rava/semolina into three equal portions in three separate containers.
2. Mix yogurt with little water and beat for 2-3 minutes.
3. In the first container of sooji, add carrot puree, salt and 1/2 tsp baking powder. The batter should be to the consistency of neither too thin nor too thick.
4. In the second container, add yogurt, salt and 1/2 tsp baking powder. Mix well.
5. In the third container, add spinach paste, salt and 1/2 tsp baking powder. Mix well.
6. All the three batters should be of the same consistency.

7. Lightly oil Idli trays with spray cooking oill.
8. Prepare idli steamer by preheating water to a boil 
9. Pour half teaspoon from each batter side by side carefully into the idli mold.
10. As soon as you finish filling all the molds, put the idli stand into the steamer.
11. Place a tight lid on the steamer and steam idlis for 15 minutes on medium heat.
12. Remove idlis from the trays by scooping them out with a spoon. 
13. The beautiful stuffed idlis are ready.Enjoy them with green chutney or tomato ketchup or sambar:)

 I have to thank my sweet sister-in -law for thinking of me & my blog when she emailed me this recipe yesterday :) 

Note: I have used pureed green peas for this recipe.

Tuesday, January 25, 2011

Shallow fried Surmai / King Fish

Everytime I visit China Town in NY city I cannot stop but marvel at the variety of vegetables,fruits,groceries and all the other exotic green stuff they display on the carts by the road side. I love the hustle & bustle and their chatty lingo which is almost impossible to decipher.  I mostly get lucky and find  fresh  fish(Indian variety) which is hard to find  even in the Indian grocery stores. This time my catch was Surmai a k a King fish. I was very excited and was already thinking of ways to prepare this fish while Mahir was driving us back home:) Dad used to love surmai and I have grown up eating various Sindhi preparations made with surmai , I had picked up a little less than 4 pounds and I knew I would fry some as a side dish and prepare the rest in gravy. So I came up with the simplest of all the recipes I could remember and I choose this because the shallow frying along with the marination of different masalas brings out the best in this fish. I will be posting the recipe for the same fish in gravy too ,so stay tuned for that:)

Here is what you will need for preparing it :
King Fish/Surmai : 1 pound- roughly 4 pieces
Lemon Juice: 2 tbsp
Salt: 1 tsp

ginger paste: 1 tbsp
garlic paste: 1 tbsp
mango powder: 1 tsp
Turmeric: 1/4 tsp
Oil: 4 -6 tbsp for shallow frying

Spices to be roasted & ground to fine powder:
Coriander: 1 tsp
Cumin: 1 tsp
Dry kashmiri Chilli: 3 
Black pepper corn: 10-12


Method:
take the fish,wash it thoroughly and pull out any coagulated blood from the cavities( this can make the fish taste bitter)
Rub a tsp of salt along with a tbsp of lemon juice. Keep it aside for 30 minutes & then wash it and pat dry on a paper towel.


Take the roasted spices powder along with ginger , garlic ,mango powder & turmeric & some salt and rub it  all over the fish. Let the fish marinate in this for at least 1 hour preferably in the refrigerator.


Take a heavy bottomed skillet and use 3 tbsp of oil,if you are going to fry the fish in 2 batches. If you have a big pan and it can fit all the fish you will fry than you can add 6 tbsp of oil in one go. Let the oil heat well. take the fish and let it shallow fry on 1 side till done on medium to low flame,you can initially cover the skillet,to avoid the oil from spluttering all over. Now flip the fish and let it fry on the other side. Let the  fish fry for the last 5 minutes  without any cover to give it a crispy texture. 


Squeeze some lime juice before serving along with some sliced onions. You can serve this with some daal & roti's or enjoy the fish with green chutney & some wine that goes well with Indian spices.  


Note: Fry the fish for the first couple minutes on high flame covered ,then turn the flame to medium or slow.

Saturday, January 22, 2011

Malay Chicken Biryani

Preparation time: 30 minutes + Marination time
Cooking Time: 40 minutes
Serves: 6

Spices to Roast & Grind:
Red Chilli: 4-6
Nigella seeds: 1 tsp
star aniseed: 2
cumin: 2 tbsp
cinnamon: 2 inch piece
black peppercorn: 1 tsp
brown cardamom: 2
cloves: 6


Dry roast all these spices and grind them coarsely in a coffee grinder,keep them aside.


Other dry Ingredients:
salt: to taste
turmeric: 1 tsp
paprika: 1 tsp or to taste
garlic powder: 1 tsp


Ingredients for marination:
ginger paste: 2 tbsp
garlic paste: 2 tbsp
Dry masala roasted and coarsely ground : 2 tbsp( save the rest for later use)
All the above dry ingredients


Other Ingredients:
Chicken: 750 g
Basmati Rice:500 g washed & soaked for 15 minutes
Tamarind: 50 g soaked for 30 minutes then press and sieve the juice/pulp
Onion Medium:  250 g or 3 onions finely sliced
curry leaves:50
Green chilli: 6-10
Olive oil: 1/2 a cup


preparation method:
marinate chicken pieces with the ingredients mentioned under marination and leave it to marinate for 1 hour.
Now take this marinated chicken and add 1/2 a cup of water cover and boil on medium heat until the chicken is tender.Then increase the heat and dry-up all the liquid.
Take a big pan and add 1/2 cup of oil and fry these chicken pieces on high heat until evenly brown stirring continuously. Remove the chicken and fried masala from the pan.
In the same oil fry the sliced onions until light golden brown.Add green chillis,curry leaves & rest of the roasted coarsely ground masala along with the tamarind pulp.Fry for a few minutes,stirring continuously. Now  add the fried chicken pieces to this add 1 cup of water and cook for a few minutes & remove from heat.


Rice:
Boil 10 cups water and cook the rice till 3/4 done.drain the rice. Take the cooked chicken curry making sure the gravy is thick and does not amount to more than 2 cups if it is more than dry it up  till it is reduced to 2 cups.
Spread this along with the rice in layers in a pan which has a tight lid. Keep it in the oven on 350 degree f for 30 minutes or till cooked.
Serve with raita & enjoy :)!!!


Note: Increase or decrease the use of green chilli's paprika and red chillis to your taste.This biryani is not mild .

I have made this biryani without curry leaves,as I was running out of these,but I strongly recommend curry leaves as these impart a very distinct flavor to the malay biryani.

This recipe was inspired by the shan malay biryani  but I wanted to avoid the color and the artificial flavors so I read the ingredients on the box and made the masala at home free of artificial colors and flavorings.


Wednesday, January 19, 2011

Karela Anda Ghotala/Bittergourd Egg Scam

Thank you Mr Sanjeev Kapoor for giving us- Anda Karela Ghotala,I loved making it & eating it !!!


Bitter gourd is one vegetable I did not eat for the longest time in my growing-up years.I did try it occasionally as my father insisted on all healthy vegetables . I found it bitter and abhorred the chewy skin & texture. I got married and found out that Mahir loves karela and he quiet enjoys it for its quintessential after taste bitterness . I don't remember when but I think some good recipes helped me in developing a taste for this vegetable. I started to  enjoy the stuffed karela and usually I like all the stuffings but my favorite would be mango stuffed karela as I enjoy the sweetness the mango lends to the slightly bitter karela.

Well this recipe is not about stuffed karela's. This is a easier recipe and does not require all the cumbersome steps that a stuffed karela recipe entails for. I browsed through Sanjeev kapoor's recipes and I was amazed to find around 15  recipes, but this karela anda ghotala recipe stood out for me as  I was quite amused by its name. Also the fact that he experimented and concocted this recipe in his kitchen piqued my curiosity and I gave it a shot. I was actually planning on making this for myself and Mahir and cook seprately for Manasi (she does not eat karela) but she happen to see this while walking through the kitchen and asked me what smelled so good- I told her it was karela/Bittergourd with egg and she said  she wanted to try a piece of karela I pretended to look normal and nonchalantly popped a tiny piece of karela in her mouth she asked for another tiny piece and oh boy!! I was still trying to pretend I was not excited :) Finally after trying the two pieces she asked me to make her roti's with this sabji-So now you have a fair idea of  how good this turned out to be. I have made some changes to the basic recipe and have used some spices that were not there in the original recipe.

Preparation Time: 10 minutes
Serves: 4

Ingredients:
karela/bitter gourd: 3 medium sized
Fired onions: 4 tbsp ( store bought)
Tomato's chopped: 1 cup
Eggs: 2
Olive oil: 2 tbsp and a few drops for frying the omlette
Ginger Chopped very fine: 1 tsp
Garlic: Chopped 1 tsp
salt: to taste
Turmeric: 1/2 tsp
mango powder: 1tsp

Masala to be roasted and then ground to a fine powder

Fennel Seeds: 1 tsp
Fenugreek: 1tsp
Corriander seeds: 1tsp
Red chilli: 3 dried or to your taste
Black pepper corn: 10
cloves: 2
Green Cardamom: 3

Method:
1. Take the karela and with a potato peeler get rid of the skin. Sprinkle salt on these and leave them aside for couple hours. The salt helps in extracting the bitterness to some extent. I left them salted for a whole day.

2. Take the karela/bittergourd and wash it,pat dry it with a paper towel to avoid the spluttering during shallow frying . Cut the karela into 2 inch pieces.

3. Take a frying pan and add 2 tbsp oil to this. When it starts to smoke ,slide in the karela/bittergourd and fry till the skin turns brown and gets a little crisp.

4. Remove them from the pan and put them aside.

5. In the same oil add the fried onions (you can also use 2 medium sized fresh onion)chopped fine. To these add ginegr & garlic, now add the diced tomatos and add salt turmeric powder,mango powder and everything under the masala which is to be roasted and ground. Cook this till you see the oil appear at the edges .

6. Take the eggs and beat them with just a pinch of salt . Make an omlette and keep it thick. Now cut this into 2 inch pieces.

7.Add the shallow fried karela/bittergourd and omlette to the fried masala and mix it carefully without scrambling the omlette pieces.
8. Garnish with chopped cilantro and squeeze some lime juice on it and serve it hot with roti 's or naan. You are going to love this :)

Notes: lately I have been using the  sultan's golden fried onion as they  save a lot of time and add a nice  rich color to almost any preparation.
If you choose to use the freshly chopped onion,then please fry them till they turn a nice golden brown.
Vegetarians can avoid the egg and add nutrella chunks instead.


Thursday, January 13, 2011

Butter Chicken Masala


 I wonder why my eyes are conditioned to spotting butter chicken on the menu every time I am in an Indian restaurant. I always remind myself that I have to order a new dish  but I end up ordering butter chicken,I am completely besotted with its richness and the creamy texture and the flavors galore never ceases to satiate me & my taste buds which are a complete  slave to this dish . I can modestly claim that I do make it the way it is served in some of the very good restaurants,but still wonder why I never fail to order this on every single trip  I make to the restaurant.

This time I have prepared this with Banne Nawab's butter chicken masala. I must tell everyone that this brand is free of any artificial flavors/colors and MSG,there is also a recipe inside the packet,which will ask you to add color if you choose to.I like these masalas a lot and the restaurant taste can be replicated when using these.
I made it according to the recipe which came with this packet but avoided the color ,butter and the fresh cream the recipe called for and trust me- you will not be disappointed, It has been declared the Best Butter Chicken by all who tasted it . So do give this one a try...here goes...

Preparation time: 10 minutes
Cooking Time: 20 minutes

1. Ingredients required : serves 5
2. boneless skinless chicken: 1 lb cut into bite size pieces
3. Onions: thinly sliced or diced very fine
4. cooking oil/olive oil: 2 tbsp
5. for garnishing: pudina/mint leaves,cilantro chopped fine
6. yogurt/curd: 50 g/1.76 oz
7. cashew nuts grounded with 1/2 cup water: 30 g? 1.06 oz
8. ustad banne nawab's hyderabadi butter chicken masala: 1 packet


Method:
Take 50 ml water and make a paste of the butter chicken masala along with the grounded cashew paste and rub it all over the chicken and put it aside.


Whip the 50 g yogurt and keep it aside.

Heat 2 tbsp Olive oil in a pan and add the thinly sliced onions when the oil turns hot. saute till pinkish brown.


Now add the chicken coated in the masala and fry for 2 - 3 minutes. Till you see the pieces are turning white.

Add yogurt,stirring continuously till the chicken and masala along with yogurt is blended well.

Now add some water depending on how thick or thin you want the gravy to be,usually the butter chicken masala gravy is thick and supposed to be enjoyed with naan or tandoori roti. So I used 1 tea cup for water.

Cover and cook,till the chicken is tender and all the gravy comes together. Now garnish with chopped mint & cilantro and cook for a couple minutes more and enjoy it hot with naan or tandoori roti.

Note: This butter chicken masala is cooked without butter,cream and color and still tastes very authentic.


Picnic table on the deck

bird  feeder with all snow & no birds:(

lamp post and ever greens submerged in snow

Icicles I see from the kitchen window:)

they are a pretty sight

some resemble a crocodiles tail

These are some pictures from the snow we had on the 11th and continued into the 12th. Our Town had a record 24 inches.All I see around my house and on the deck is mountains of snow,and icicles from the roof .It is a very pretty sight even though the snow on the roof scares me-What if the roof caves in with the weight of the snow...*fingers crossed*

Monday, January 10, 2011

Whole Roast Chicken

I took myself by surprise when I brought home a whole raw chicken, I normally buy the ready to eat  from Stew  Leonard's and never bother to cook it myself. I guess it was about time  & my culinary curiosity got the better of me. I am thrilled with the result  as I have used  very minimum oil and have played with the herbs and spices that I enjoy. It tastes very good and nothing beats home made stuff, also I have to mention here that it is not at all cumbersome to cook the whole bird contrary to my earlier impression of how messy this whole affair could get.

So here is the recipe for cooking the whole chicken,hope you will like it and give it a try .

Preparation Time: 20 minutes ( excluding the marination time )
Cooking Time: Little less than 2 hours

Ingredients:
Whole Chicken: 1 weighs about 3 1/2 -4 pounds
Garlic : 8-10 cloves
Rosemary: 3 -4 sprigs
Thyme: 3-4 sprigs
Lemon: 4 tbsp
tangerine juice: 4 tbsp
Crushed peppercorn: 1 tbsp
Cayenne pepper: 1 tsp or to your taste
Olive Oil: 2 tbsp
Kosher salt: 1 tbsp or to your taste

Method:

take the whole chicken & wash it under cold water.remove the giblets from the neck. Pat dry it with a paper towel.
Take the lemon juice,tangerine juice in a bowl and add crushed peppercorn,cayenne pepper,olive oil and kosher salt and rub this on the insides and outside of the chicken thoroughly. Take the thyme and rosemary sprigs and stick them in all the cavities along with garlic cloves. Now put this in a large vessel( cover it with the cling film) or a 1 gallon zip lock bag and leave it in the fridge for 24 hours.

Pre-heat the oven to 450 degree f and take a roaster pan,if you do not have the roaster pan,take any regular oven tray and cut a sheet of aluminium foil and   coil the aluminium sheet and  make an 8 with the coiled sheet and put this on the tray and let your chicken sit on this breast side up. Cook the chicken at 450 degree f for the first 15 minutes  covered with an aluminium foil ,then bring down the temperature to 400degree f and cook till the thermometer in the chicken pops out it takes roughly 1 1/2 hours. Keep basting the chicken with the left over liquid from the marination.You can also use butter if you like while basting the chicken.  You can also choose to broil the chicken when it is nearly done to give the skin a charcoal burned look.

Notes: I have not used thermometer to check the internal temperature,I inserted a knife to see if the chicken was done after 1 1/2 hours.
I covered the chicken with an aluminium foil,as the drained liquid/juices from the chicken in the pan were splashing all over inside the oven.

The chicken needs air movement on the underneath in absence of a roaster pan,so the coiled aluminium foil comes in handy and it gets evenly cooked on all sides.

You can stuff the chicken with vegetables of your choice. I have used potato's to stuff the chicken.

Wednesday, January 5, 2011

Pav Bhaji/Bread With Mashed Masala Vegetables

Most popular and commonly found street food in India and now served in upscale restaurants as well . I was pregnant with Manasi and had huge cravings for Pav Bhaji in my 1st trimester :) It so happened that our flat in Pune was walking distance from this popular eating joint called,"Kinara" this place was very popular for its Pav Bhaji and I refused to cook anything at home then,every time I was hungry I would ask Mahir to take me to Kinara :) No wonder Manasi loves pav Bhaji,that reminds me-maybe I should take her to Kinara this time when I visit Pune,let me see what she thinks of the Pav Bhaji which she practically grew up on those first three months inside the tummy:)

I love the fact that this fun food is so simple to put together and tastes absolutely fantastic,I have yet to figure out how to prepare the pav bhaji masala at home right from scratch but meanwhile the store bought shall serve the purpose.

Here goes:
Boiled Potato: 2 medium boiled and mashed
Carrots: 2 medium sized boiled and mashed
Green peas: 1 cup boiled and mashed
tomato's: 4 medium boiled skinned and pureed
Ginger paste: 1 tsp
garlic: 1 tsp
pav bhaji Masala: 3 tbsp or to your taste
salt: 1 tsp
green chilli: 2 chopped very fine
Cilantro: 2 tbsp chopped for garnishing
onion: 2 medium sized chopped (some chopped very fine for garnishing)
Oil: 4 tbsp
Lime juice: 3 tbsp

Method:

Take a big kadai and heat oil,drop the  chopped onions in  the oil along with ginger & garlic when it turns hot ( save little for garnishing) saute the onions till they turn a nice golden color

To this add the boiled and mashed potato's and green peas and carrots.Mash these well and add the tomato puree and add the pav bhaji masala along with chopped green chillis and continue to mash this with the back of the spoon. There should be no big pieces of carrots or potatos. Cook for some more time and add salt,when ready to serve garnish with cilantro and very fine chopped onions and squeeze some lemon juice. You can also serve it with a pat of butter for lunch,dinner or even as an evening snack.

For the Pav:

Take the pav and brush some butter on the griddle , when hot heat the pav on both sides and let these turn a little brown on the edges. Serve with bhaji :)


Tuesday, January 4, 2011

Braided Paneer& Potato Bread

aaah :)!!! It feels nice to be writing and reading posts by other blogger friends. I feel charged and rejuvenated after a good 10 days break.Mahir and Manasi were home and we spent some wonderful family time.Visited friends ,watched movies,slept late and woke up late and ate some  good food cooked by friends. Oh yes- we also happened to be driving back from New Jersey on the 26th December the dreadful day when east coast was hit by a major nor'easter. We drove 20-30 miles an hour and got home in 3 1/2 hours,but it felt nice to be home safe :)  I cannot describe how special and blessed we felt after having braved the 3/12 hour ordeal on the roads , now back in the luxury and safety of our home :) The night was spent by the fire place enjoying chicken biryani which I had cooked the day before and freezed for later use. We woke up on the morning of 27th to find 11/2 feet of snow on our deck. New year's eve was spent in Schenectady NY,with friends- playing pictionary and dumb charade and eating yummy food and dancing to ring in the New Year :)

I had fun going through all the lovely posts today and the post that instantly caught my eye was Aipi's -Braided paneer bread. It was love at first sight  with this beauty and I was lucky to have found all the ingredients handy.I set out to make this wonderful looking bread with all my favorite ingredients. Aipi I was not sure I would do justice to the bread you had created so well but I  must admit the recipe is so well illustrated and described that the bread actually turned out perfect and I am glad I made it as Manasi also loved it and I am sure Mahir will ,once he gets back from work and gets to taste it.

I have basically done the exact same thing except for the yeast,I have used the dry yeast in place of the rapid rise yeast that the original recipe calls for. I let the yeast sit in 1/4  cup of warm water along with sugar  instead of milk and later on after the yeast was frothy and bubbly I added the milk and reduced the quantity by 1/4  cup. Other than that everything is the same.


Ingredients:
All purpose flour: 11/2 cup
wheat Flour: 1 cup
Instant Dry yeast: 1/2 tbsp
Warm water: 1/4 cup ( to dissolve yeast)
Sugar: 1/2 tbsp
Salt: 1/2 tsp
Olive Oil: 2 tbsp
Milk: 1/2 cup warm and some more to brush the bread before baking
Sesame seeds: 1/2 tsp

Filling For Bread:
Paneer/cottage cheese: grated 1 1/2 cup
Boiled potato's: 2 medium peeled and chopped into tiny pieces
Green peas: boiled 1 cup
Fennel seeds: 1 tsp
Cumin seeds: 1 tsp
Hing: a pinch
salt: to taste
Red pepper: to taste
Chaat Masala: 1 tsp
Mango Powder/amchur: 1 tsp
Garam masala: 1 tsp
Green chilli: 1 chopped fine
Cilantro: chopped 2 tbsp
Oil: 2 tbsp
Take a pan and heat oil,then add fennel , cumin and hing/asfoetida ,when it starts to splutter add the green peas along with  boiled and chopped potato's.Add all the dry masalas, and then add the grated paneer and give it a good stir and add chopped cilantro and keep it aside to cool down.

For the bread:
Take 1/4 cup warm water in a bowl and add yeast and sugar and keep it in a warm place for 10 minutes or till it becomes bubbly and frothy.
Take all purpose flour along with wheat flour and add 2 tbsp oil along with salt and mix it well. Then take the  alive yeast and add 1/2 cup warm milk to it and knead the flour,if you need more liquid to knead the flour take some more warm milk. When the dough is ready take some oil on your palms and coat the kneaded dough well with the oil and then leave it in bowl covered with a wet kitchen towel and keep it in warm place to rise. It will take about an hour to double in size.
Note: I had to use more liquid to knead the flour since I used the golden temple wheat flour which has a lot of husk and is very dry.

Method:
When the dough is double its size,take it out and with your fist deflate the dough.Roll it on floured surface into an oblong shape about 15 inches inches long and 8 inches wide.


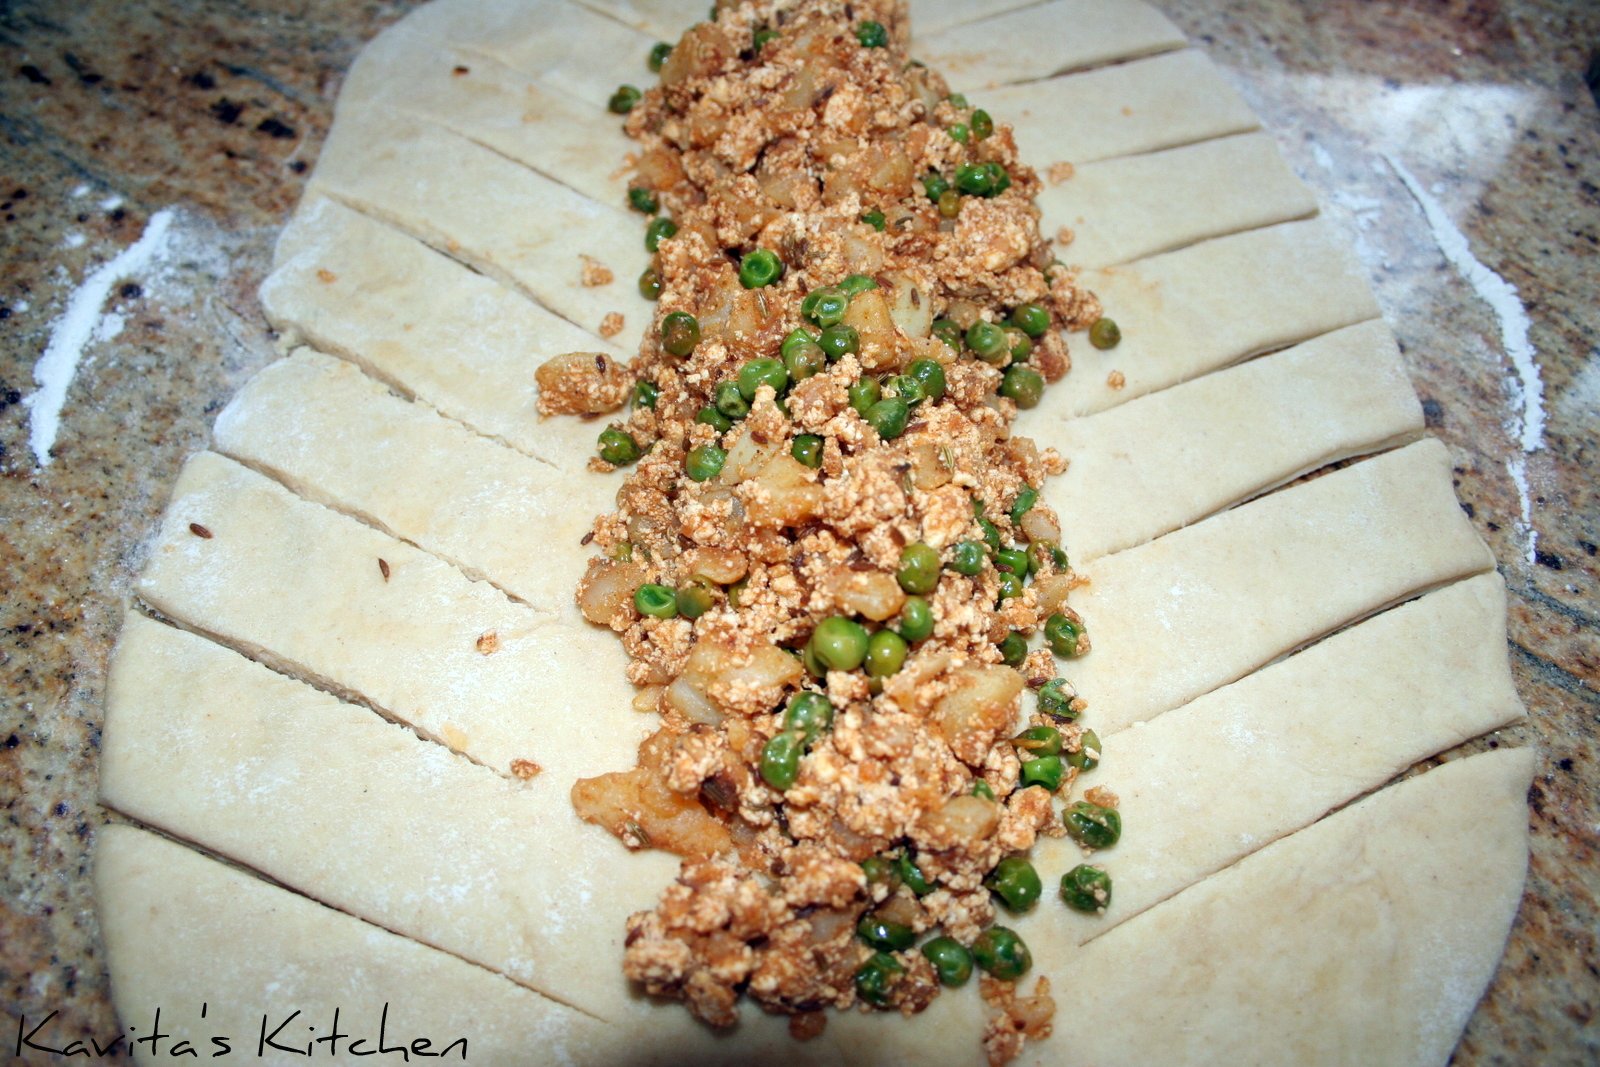
Keep the paneer/cottage cheese and potato filling in the centre and make slits on either sides of the rolled out oblong,making sure they are even  and equal on both sides. Now fold them on either side like a braid making sure the filling is secure. You can take the loose ends and fold them under the bread or do an overlapping as shown in the picture. Cover this with a wet cloth and leave it in warm place to rise again for 30 minutes.
Meanwhile pre-heat the oven to 375 degrees F. When the bread has doubled in size again ,take off the wet cloth brush the bread with milk and sprinkle sesame seeds and leave it in the oven till it turns golden brown ,it takes about 15- 20 minutes. Let it sit out till it is warm then make slices and enjoy with green chutney or tomato ketchup,mine just flew away between the three of us :) Oh yes- Mahir loved it :)